This article is the continuation of the Series on the C programming tutorial and carries the discussion on C language programming and its implementation. It aims to provide easy and practical examples for understanding the C program. In our last article, we have seen the Callback function in C programming.
If you have attended an Interview for any Embedded companies, obviously interviewer might have asked this question. What are the stages of the compilation process in C and the Memory Layout of the program? So, in this tutorial, we are going to discuss the Compilation Steps and Memory Layout of the C Program.
You can also read, types of pointers, storage classes, pointers in c, boot sequence in ARM cortex-M4, macro vs inline, LPC2148 LCD interfacing, and PIC16F877A LCD interfacing.
Table of Contents
Compilation Steps and Memory Layout of the C Program
What are the four stages of the compilation process?
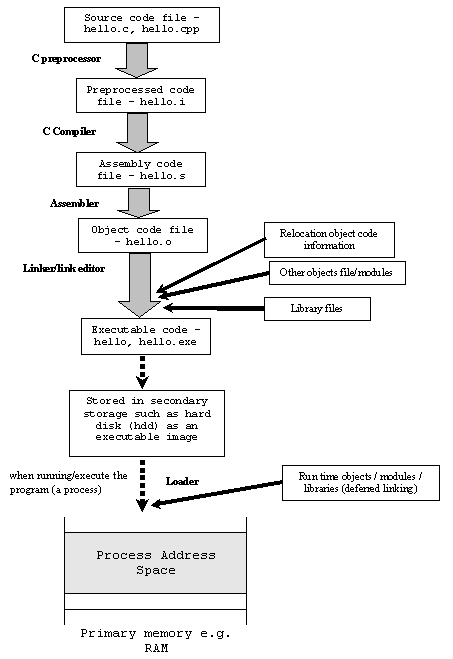
Normally Compiling a C program is a multi-stage process and utilizes different ‘tools’.
In this post, I’ll walk through each one of the four stages of compiling stages using the following C program:
/*
 * "Hello, World!": A classic.
 */

#include <stdio.h>

int main(void)
{
    puts("Hello, World!");
    return 0;
}
Preprocessing
The first stage of compilation is called preprocessing. In this stage, lines starting with a # character are interpreted by the preprocessor as preprocessor commands. Before interpreting the commands, the preprocessor does some initial processing. This includes joining continued lines (lines ending with a \) and stripping comments.
To print the result of the preprocessing stage, pass the -E option to cc:
cc -E hello_world.c
Given the “Hello, World!” example above, the preprocessor will produce the contents of the stdio.h header file joined with the contents of the hello_world.c file, stripped free from its leading comment:
[lines omitted for brevity]

extern int __vsnprintf_chk (char * restrict, size_t,
       int, size_t, const char * restrict, va_list);
# 493 "/usr/include/stdio.h" 2 3 4
# 2 "hello_world.c" 2

int main(void) {
 puts("Hello, World!");
 return 0;
}
Compilation
The second stage of compilation is confusingly enough called compilation. In this stage, the preprocessed code is translated to assembly instructions specific to the target processor architecture. These form an intermediate human-readable language.
The existence of this step allows for C code to contain inline assembly instructions and for different assemblers to be used.
Some compilers also support the use of an integrated assembler, in which the compilation stage generates machine code directly, avoiding the overhead of generating the intermediate assembly instructions and invoking the assembler.
To save the result of the compilation stage, pass the -S option to cc:
cc -S hello_world.c
This will create a file named hello_world.s, containing the generated assembly instructions. On Mac OS 10.10.4, where cc is an alias for clang, the following output is generated:
.section    __TEXT,__text,regular,pure_instructions
    .macosx_version_min 10, 10
    .globl  _main
    .align  4, 0x90
_main:                                  ## @main
    .cfi_startproc
## BB#0:
    pushq   %rbp
Ltmp0:
    .cfi_def_cfa_offset 16
Ltmp1:
    .cfi_offset %rbp, -16
    movq    %rsp, %rbp
Ltmp2:
    .cfi_def_cfa_register %rbp
    subq    $16, %rsp
    leaq    L_.str(%rip), %rdi
    movl    $0, -4(%rbp)
    callq   _puts
    xorl    %ecx, %ecx
    movl    %eax, -8(%rbp)          ## 4-byte Spill
    movl    %ecx, %eax
    addq    $16, %rsp
    popq    %rbp
    retq
    .cfi_endproc

    .section    __TEXT,__cstring,cstring_literals
L_.str:                                 ## @.str
    .asciz  "Hello, World!"


.subsections_via_symbols
Assembly
During the assembly stage, an assembler is used to translate the assembly instructions to machine code, or object code. The output consists of actual instructions to be run by the target processor.
To save the result of the assembly stage, pass the -c option to cc:
cc -c hello_world.c
Running the above command will create a file named hello_world.o, containing the object code of the program. The contents of this file are in a binary format and can be inspected using hexdump or od by running either one of the following commands:
hexdump hello_world.o
od -c hello_world.o
Linking
The object code generated in the assembly stage is composed of machine instructions that the processor understands but some pieces of the program are out of order or missing. To produce an executable program, the existing pieces have to be rearranged and the missing ones filled in. This process is called linking.
Let’s assume your project contains two ( hello.c and world.c) source files. So, when you compile the project, the assembler will give you hello.o and world.o object files. In the end, we need only one binary file that has to be loaded into the target processor or controller. So, the linker will arrange those hello.o and world.o, gives a single binary file.
That’s why you will get a error from the linker when you are calling the function which is not defined anywhere. Linker tries to find that function in other source files and throws an error if it couldn’t find that.
The linker will arrange the pieces of object code so that functions in some pieces can successfully call functions in other pieces. It will also add pieces containing the instructions for library functions used by the program. In the case of the “Hello, World!” program, the linker will add the object code for the puts function.
The result of this stage is the final executable program. When run without options, cc will name this file a.out. To name the file something else, pass the -ooption to cc:
cc -o hello_world hello_world.c
For your quick reference :
Memory Layout of the C Program
When you run any C program, its executable image is loaded into the RAM of the computer in an organized manner which is called the process address space or Memory layout of the C program.
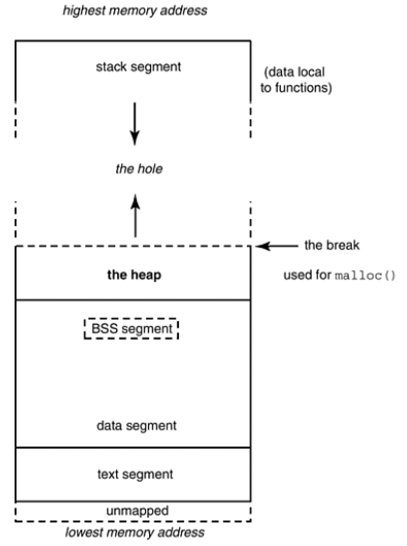
This memory layout is organized in the following fashion:
- Text or Code Segment
- Initialized Data Segments
- Uninitialized Data Segments (BSS)
- Stack Segment
- Heap Segment
- Unmapped or Reserved Segment
Text or Code Segment
The code segment, also known as the text segment which contains the machine code of the compiled program. The text segment of an executable object file is often a read-only segment that prevents a program from being accidentally modified. So this memory contains .bin or .exe or .hex etc.
As a memory region, a text segment may be placed below the heap or stack in order to prevent heaps and stack overflows from overwriting it.
Data Segments
The data segment stores program data. This data could be in the form of initialized or uninitialized variables, and it could be local or global. The data segment is further divided into four sub-data segments (initialized data segment, uninitialized or .bss data segment, stack, and heap) to store variables depending upon if they are local or global, and initialized or uninitialized.
Initialized Data Segment
Initialized data or simply data segment stores all global, static, constant, and external variables (declared with extern keyword) that are initialized beforehand.
Note that, the data segment is not read-only, since the values of the variables can be changed at run time.
This segment can be further classified into the initialized read-only area and the initialized read-write area.
All global, static, and external variables are stored in initialized read-write memory except the const variable.
//This will stored in initialized read-only memory
const int i = 100;

//This will stored in initialized read-write memory
int j=1;
char c[12] = "EmbeTronicX"

int main()
{

}
Uninitialized Data Segment
The uninitialized data segment is also called as BSS segment. BSS stands for ‘Block Started by Symbol’ named after an ancient assembler operator. The uninitialized data segment contains all global and static variables that are initialized to zero or do not have explicit initialization in the source code.
//This will stored in uninitialized read-only memory
static int i = 0;
int j;

int main()
{

}
Stack Segment
The stack is the place where automatic variables are stored, along with information that is saved each time a function is called. Each time a function is called, the address of where to return to and certain information about the caller’s environment, such as some of the machine registers, are saved on the stack. The newly called function then allocates room on the stack for its automatic and temporary variables. This is how recursive functions in C can work. Each time a recursive function calls itself, a new stack frame is used, so one set of variables doesn’t interfere with the variables from another instance of the function.
So, the Stack frame contains some data like the return address, arguments passed to it, local variables, and any other information needed by the invoked function.
A “stack pointer (SP)” keeps track of the stack by each push & pop operation onto it, by adjusting the stack pointer to the next or previous address.
The stack area traditionally adjoined the heap area and grew in the opposite direction; when the stack pointer met the heap pointer, free memory was exhausted. (With modern large address spaces and virtual memory techniques they may be placed almost anywhere, but they still typically grow in opposite directions.)
You can learn the stack implementation in the C program in this article.
Heap Segment
Heap is the segment where dynamic memory allocation usually takes place.
The heap area begins at the end of the BSS segment and grows to larger addresses from there. The Heap area is managed by malloc, realloc, and free, which may use the brk and sbrk system calls to adjust its size (note that the use of brk/sbrk and a single “heap area” is not required to fulfill the contract of malloc/realloc/free; they may also be implemented using mmap to reserve potentially non-contiguous regions of virtual memory into the process’ virtual address space). The Heap area is shared by all shared libraries and dynamically loaded modules in a process.
Unmapped or reserved segment
Unmapped or reserved segments contain command-line arguments and other program-related data like the lower address-higher address of the executable image, etc.
Memory layout in C with examples
Just see the below example. I will tell you the Memory layout using a practical example.
Example
Step 1:
We will see the memory layout of the below program.
#include <stdio.h>

int main(void)
{
    return 0;
}
Compile and Check memory.
[embetronicx@linux]$ gcc memory-layout-test.c -o memory-layout-test

[embetronicx@linux]$ size memory-layout-test

text       data        bss        dec         hex       filename
960        248          8        1216         4c0    memory-layout-test
Step 2:
Let us add one global variable in the program, now check the size of bss.
#include <stdio.h>

int embetronicx;   //uninitialized global variable. It will stored in bss

int main(void)
{
    return 0;
}
Compile and Check Memory.
[embetronicx@linux]$ gcc memory-layout-test.c -o memory-layout-test

[embetronicx@linux]$ size memory-layout-test

text       data        bss        dec        hex    filename

960        248         12       1220         4c4    memory-layout-test
Step 3:
Let us add one static variable which is also stored in bss.
#include <stdio.h>

int embetronicx;   //uninitialized global variable. It will stored in bss

int main(void)
{
    static int i;  //Uninitialized static variable stored in bss
    return 0;
}
Compile and Check.
[embetronicx@linux]$ gcc memory-layout-test.c -o memory-layout-test

[embetronicx@linux]$ size memory-layout-test

text       data        bss        dec          hex    filename

960        248         16         1224         4c4    memory-layout-test
Step 4:
Let us initialize the static variable to non zero which will then be stored in the Initialized Data Segment (DS).
#include <stdio.h>

int embetronicx;   //uninitialized global variable. It will stored in bss

int main(void)
{
    static int i = 10;  //Initialized static variable stored in Initialized Data Segment
    return 0;
}
Compile and Check.
[embetronicx@linux]$ gcc memory-layout-test.c -o memory-layout-test

[embetronicx@linux]$ size memory-layout-test

text       data        bss        dec          hex    filename

960        252         12         1224         4c4    memory-layout-test
Step 5:
Let us initialize the global variable to non zero which will then be stored in the Initialized Data Segment (DS).
#include <stdio.h>

int embetronicx = 100;   //Initialized Global variable stored in Initialized Data Segment

int main(void)
{
    static int i = 10;  //Initialized static variable stored in Initialized Data Segment
    return 0;
}
Compile and Check
[embetronicx@linux]$ gcc memory-layout-test.c -o memory-layout-test

[embetronicx@linux]$ size memory-layout-test

text       data        bss        dec          hex    filename

960        256          8         1224         4c4    memory-layout-test
Last Word
In this tutorial, we talked about the steps involved in the compilation and memory layout of a C program, and its various segments (text or code segment, data, .bss segments, stack and heap segments). Hope you have enjoyed reading this article.
In our next article, Stringizing and Token Pasting Operators in C programming.
You can also read the below tutorials.
Embedded Software | Firmware | Linux Devic Deriver | RTOS
Hi, I am a tech blogger and an Embedded Engineer. I am always eager to learn and explore tech-related concepts. And also, I wanted to share my knowledge with everyone in a more straightforward way with easy practical examples. I strongly believe that learning by doing is more powerful than just learning by reading. I love to do experiments. If you want to help or support me on my journey, consider sharing my articles, or Buy me a Coffee! Thank you for reading my blog! Happy learning!
